How to automatically manage application certificates across thousands of edge sites
It is a well-established practice to use certificates to affirm the identity of an application. Managing certificates can be cumbersome, especially when you may need 100s or 1000s of them for all your edge sites. A bad practice from a security perspective is to create very long-lived certificates, just to save yourself the hassle of having to update them all again. So there is a trade-off between security and operational costs if you do not automate certificate management.
In this article we will show how you can use Avassa to:
- generate certificates
- distribute the certificates to edge sites
- auto-rotate the certificates (to support short-lived certificates)
Strongbox, the Avassa Secret Vault
The Avassa secret vault, “Strongbox”, can be configured to generate certificates for applications, and rotate them as necessary. It is also possible to import a CA and its private key into Strongbox, but in this example we will instruct Strongbox to generate a CA.
$ supctl create strongbox tls ca <<EOF
name: nginx-ca
ttl: 30d
auto-renew:
  # Auto renew the CA when there are 5 days left
  renew-threshold: 5d
distribute:
  deployments:
    - nginx
EOF
This command will generate a CA called nginx-ca the CA has a time to live of 30 days, and a new CA is generated 5 days before it will expire. The CA will also be automatically distributed to edge sites where nginx is deployed. The above shows the strength of a well-integrated platform for secretes and applications, the certificate will “follow” the application deployment. If these two entities are managed over separate APIs, it is very easy to forget one or another operation.
Next create a role that defines what the CA can be used for, in this example to generate server certificates.
$ supctl create strongbox tls ca nginx-ca roles <<EOF
application-examples/nginx/cert-issuer.nginx-ca.ca-role.yaml
name: cert-issuer
allow-client-certs: false
allow-server-certs: true
allowed-domains:
 - "*"
allowed-hosts:
 - "*"
EOF
We have now prepared the CA and are ready to define a secrets vault using that:
$ supctl create strongbox vaults <<EOF
name: nginx
distribute:
  deployments:
    - nginx
EOF

$ supctl create strongbox vaults nginx secrets <<EOF
name: server-cert
auto-cert:
  cert-type: server
  host: nginx.nginx
  issuing-ca: nginx-ca <<< The CA
  ttl: 5d
allow-image-access:
  - "*"
EOF
First we create an nginx vault and in that vault a server certificate secret. The secret refers to the nginx-ca previously created and which has a ttl of 5 days.
Finally we use the certificate in an application as shown below:
supctl create applications <<EOF
name: nginx
version: "1.0"
services:
  - name: nginx
    mode: replicated
    replicas: 1
    volumes:
      - name: cert
        vault-secret:
          vault: nginx
          secret: server-cert
      - name: cfg
        config-map:
          items:
            - name: default.conf
              data: |
                server {
                  listen 443 ssl;
                  server_name  nginx.nginx.${SYS_TENANT}.${SYS_SITE}.${SYS_GLOBAL_DOMAIN}
                  ssl_certificate /etc/ssl/certs/nginx.pem;
                  ssl_certificate_key /etc/ssl/private/nginx.key;
                  ssl_protocols TLSv1.1 TLSv1.2;
                  ssl_ciphers         HIGH:!aNULL:!MD5;

                  location / {
                      root   /usr/share/nginx/html;
                      index  index.html index.htm;
                  }

                  error_page   500 502 503 504  /50x.html;
                  location = /50x.html {
                      root   /usr/share/nginx/html;
                  }
                }

    network:
      ingress-ip-per-instance:
        protocols:
          - name: tcp
            port-ranges: "80,443"
    containers:
      - name: nginx
        image: registry-1.docker.io/nginx
        mounts:
          - volume-name: cfg
            files:
              - name: default.conf
                mount-path: /etc/nginx/conf.d/default.conf
          - volume-name: cert
            files:
              - name: cert.pem
                mount-path: /etc/ssl/certs/nginx.pem
              - name: cert.key
                mount-path: /etc/ssl/private/nginx.key
EOF
A couple of things to zoom in on:
    volumes:
      - name: cert
        vault-secret:
          vault: nginx
          secret: server-cert
This instruct the Avassa system to create a volume called cert from the vault/secret defined above.
      mounts:
...
          - volume-name: cert
            files:
              - name: cert.pem
                mount-path: /etc/ssl/certs/nginx.pem
              - name: cert.key
                mount-path: /etc/ssl/private/nginx.key
The content of this volume (certificate and private key) are then mounted into the container. Please also note the nginx.conf part above where these files are referenced.
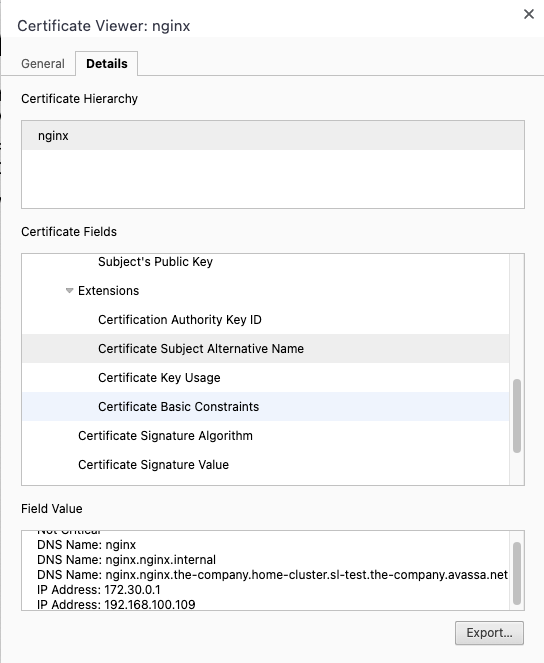
Also worth looking at in nginx.conf is server_name nginx.nginx.${SYS_TENANT}.${SYS_SITE}.${SYS_GLOBAL_DOMAIN}.
These variables will expand when deployed, this will make the server name match the certificate subject alternate names (SANs), please see below.
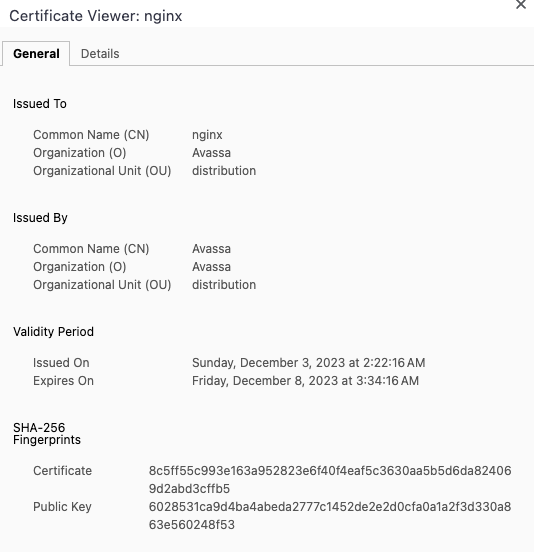
Navigating to one of the running nginx instances, I can inspect the generated certificate. Note e.g., the 5 day ttl. Below we can the that the correct SANs are generated.
Conclusion
This blog shows how easy it is to generate a CA and server certificates to use in your applications and the certificates will be automatically rotated according to your policy.
This example can be found here: https://gitlab.com/avassa-public/application-examples/-/tree/main/nginx?ref_type=heads