September 2024: Feature releases & highlights
CSV Export, Login options guidance, Recursive DNS lookups
- CSV Export in
supctl: You can now get output from the Avassa command line formatted as CSV, which is helpful for import to other tools and manual inspection. - New documentation for proxy connections: We have added documentation on how to use the command line tool to create proxy connections at the site.
- Guidance on login options: When logging in, you need to know your tenant and whether the control tower or an external OIDC manages your user. We have added guidance on how to get the correct login URL.
- Recursive DNS lookup from the local network: devices on the edge site local network can now use the Avassa built-in DNS as a general DNS server.
CSV Export
Sometimes, small “simple” things are also helpful in advanced systems. The Avassa Edge Platform maintains a high-quality inventory of your edge infrastructure and applications. Data such as edge sites, hosts, and applications with corresponding configurations and states are valuable assets for your organization’s various IT and inventory systems. This data can be accessed using the Control Tower UI, the Rest API, and the command line.
To get a list of your sites:
$ supctl show system sites --fields name,descriptive-name,call-home-state,hosts/hostname
- name: robot-9
  descriptive-name: Robot 9
  call-home-state:
    all-hosts:
      called-home: 1
      total: 1
    controller-hosts:
      called-home: 1
      total: 1
    cluster-established: true
  hosts:
    - hostname: robot-9-1
- name: robot-8
...
To get an easier to read output supctl already supports a table output option:
$ supctl --table show system sites --fields name,descriptive-name,call-home-state,hosts/hostname
name              descriptive-name           called-home   total   called-home   total   cluster-established   hostname
---------------   ------------------------   -----------   -----   -----------   -----   -------------------   ---------------
robot-9           Robot 9                    1             1       1             1       true                  robot-9-1
robot-8           Robot 8                    3             3       3             3       true                  robot-8-1
                                                                                                               robot-8-2
                                                                                                               robot-8-3
robot-7           Robot 7                    1             1       1             1       true                  robot-7-1
robot-6           Robot 6                    3             3       3             3       true                  robot-6-1
                                                                                                               robot-6-2
                                                                                                               robot-6-3
robot-5           Robot 5                    1             1       1             1       true                  robot-5-1
robot-4           Robot 4                    3             3       3             3       true                  robot-4-1
                                                                                                               robot-4-2
                                                                                                               robot-4-3
robot-3           Robot 3                    1             1       1             1       true                  robot-3-1
robot-2           Robot 2                    1             1       1             1       true                  robot-2-1
robot-10          Robot 10                   3             3       3             3       true                  robot-10-1
                                                                                                               robot-10-2
                                                                                                               robot-10-3
robot-1           Robot 1                    3             3       3             3       true                  robot-1-1
                                                                                                               robot-1-2
                                                                                                               robot-1-3
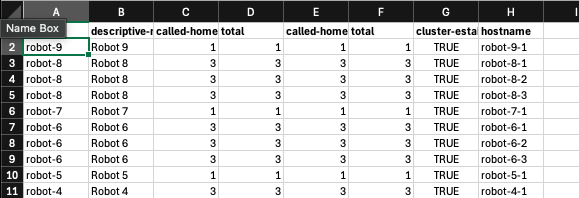
But in many situations it would be helpful to have the same information available in CSV format. This means you can import it to your favourite spreed sheet tool and manipulate the data. It is also useful as import format to other systems. For this purpose we have now added a csv output option:
$ supctl --csv show system sites --fields name,descriptive-name,call-home-state,hosts/hostname > sites.csv
This can now be imported to for example Excel:
Proxy Documentation
A hidden gem in the Avassa command line interface supctl is the ability to forward connections from an edge application to a local port where you’re running the command. It’s similar to the ssh -L feature in OpenSSH.
We’ve added instructions on how to use this feature. Here’s an example from the new documentation:
$ supctl do -s stockholm-sergel applications popcorn-controller service-instances \
  popcorn-controller-service-1 connect tcp 443 --bind 8443
This command forwards the TCP connection for popcorn-controller-service-1 from the edge site’s port 443 to the local host’s port 8443.
In a similar manner you can proxy to a remote device at the edge site:
$ supctl do -s stockholm-sergel applications popcorn-controller service-instances \
popcorn-controller-service-1 connect tcp 443 --ip-address 192.0.2.11 --bind 8443
It’s important to note, when connecting to a device at the edge site, the connection is initiated from the service’s IP address.
Guidance on Tenant Logins
Avassa provides rich support for multi-tenancy. You can share and split the edge infrastructure among internal and external organizations. All users in the Avassa Edge Platform belong to a tenant. This means that when you log in with your user ID, you need to do so within a tenant context.
Another important aspect of login is that authentication can be provided by the Avassa Control Tower or by an external OIDC provider.
These two elements—tenant context and authentication providers—can be challenging to keep in mind when logging in. To assist users, we’ve added Control Tower User Interface guidance and options to help you access the correct login.
The user menu now includes helpful guidance:
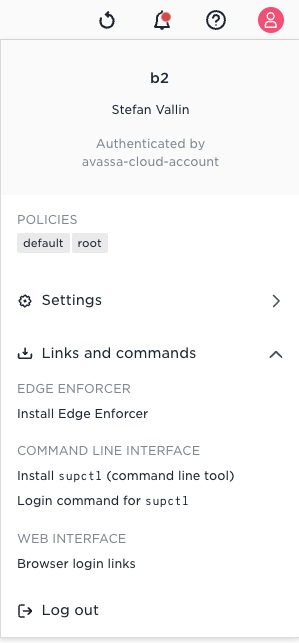
If you pick the Browser login links you will see the following:
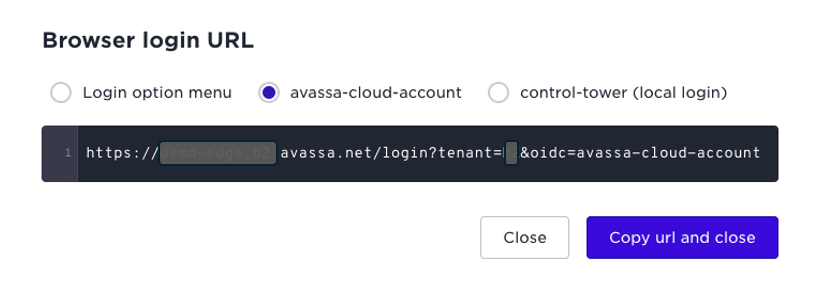
You get three options:
- Go to the umbrella login page where you have to manually select login option
- Direct link to OIDC
- Direct link to Control Tower internal login
This guidance is also helpful for assisting other users in your organization. The same information is available for supctl.
When you create a tenant and want to guide its users, you can find valuable links by using the “Links and commands” menu in the top right corner for that tenant.

It will provide the following:
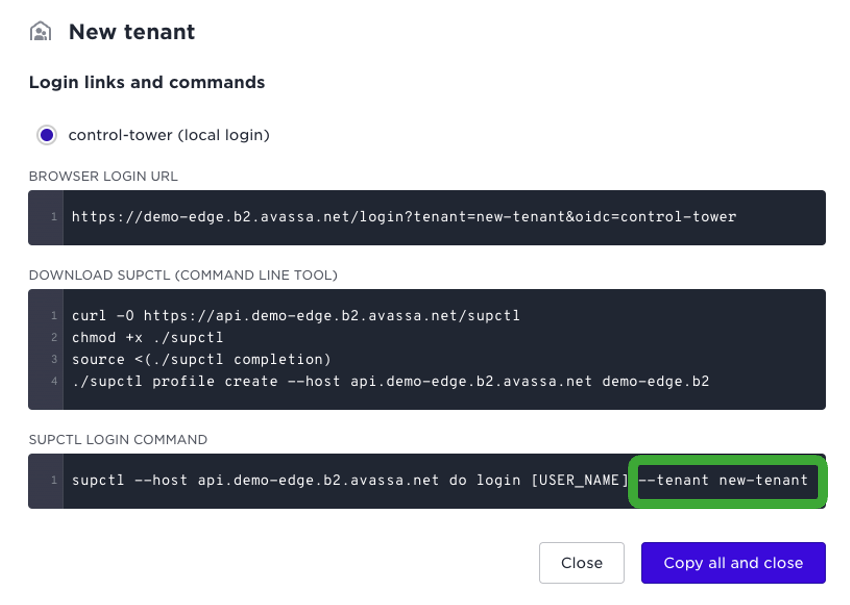
You can for example copy all that information and forward it in an email.
Recursive DNS Lookups
You may now know this, but the Edge Enforcer acts as a DNS server. It is mainly used for applications deployed in Avassa for service discovery, but also for devices on the (site) local network. For example discover a REST ingress endpoint.
Applications deployed in Avassa has always been able to do recursive DNS lookups, e.g. resolve IP addresses on internet such as avassa.io. Devices on the local network has previously been restricted to only resolve application IPs, i.e. service discovery.
This restriction is now removed, thus allowing external devices to use the Edge Enforcer as a general DNS server.
Paul Mockapetris: who?
DNS is one of those elegant designs that simply serves you. Imagine the Internet in the ’80s. You had to maintain a hosts.txt file for address lookups.
Paul Mockapetris on DNS: “It was created to let people use names for anything. But we had to figure out how to organize the distribution of domain names and how to ensure the system could accommodate diversity without unnecessary restriction.”
Students at the University of California, Berkeley developed the first implementation, BIND (Berkeley Internet Name Domain), in 1983. This was later followed by standardization through RFCs (1034 and 1035).
To learn more about the history of DNS and Mockapetris’s contributions, check out this informative DNS history write-up from ClouDNS.