April 2025: Feature releases & highlights
Enhanced VM Orchestration, login usability, and passkey support.
- Enhanced VM orchestration: The VM orchestration base container image and examples now provide richer flexibility, and the VM restart mechanism is improved.
- Login flow usability and passkeys: We have enhanced the overall user login flow and added support for passkeys
Enhanced Virtual Machine Orchestration
The Virtual Machine (VM) orchestration capabilities have been enhanced in several ways:
- Enhanced controlled restarts
- Enriched base image and examples
Restart management
We have added functionality to restart and shut down a virtual machine gracefully.
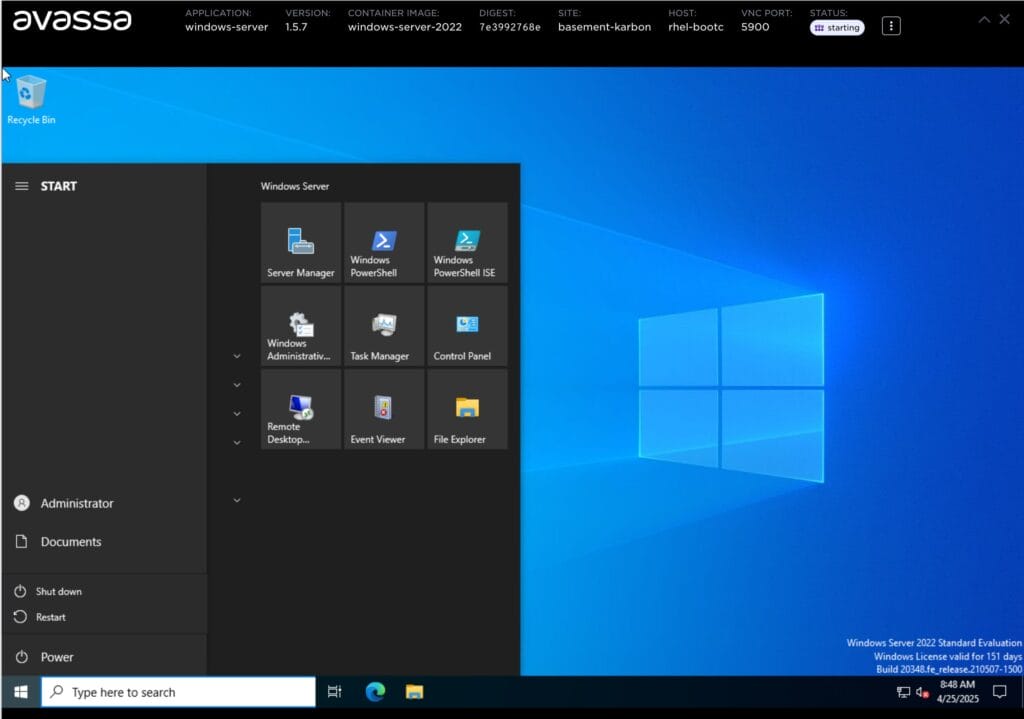
Below is a screenshot from a virtual Windows server.
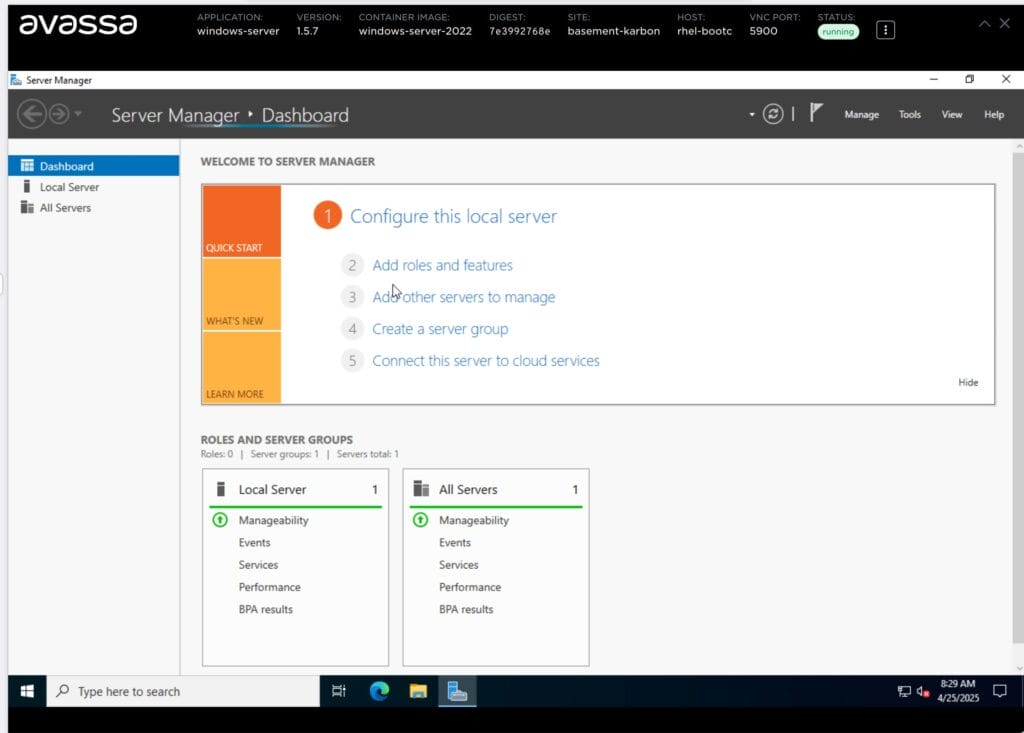
To gracefully restart the VM, select the service instance and choose restart service.
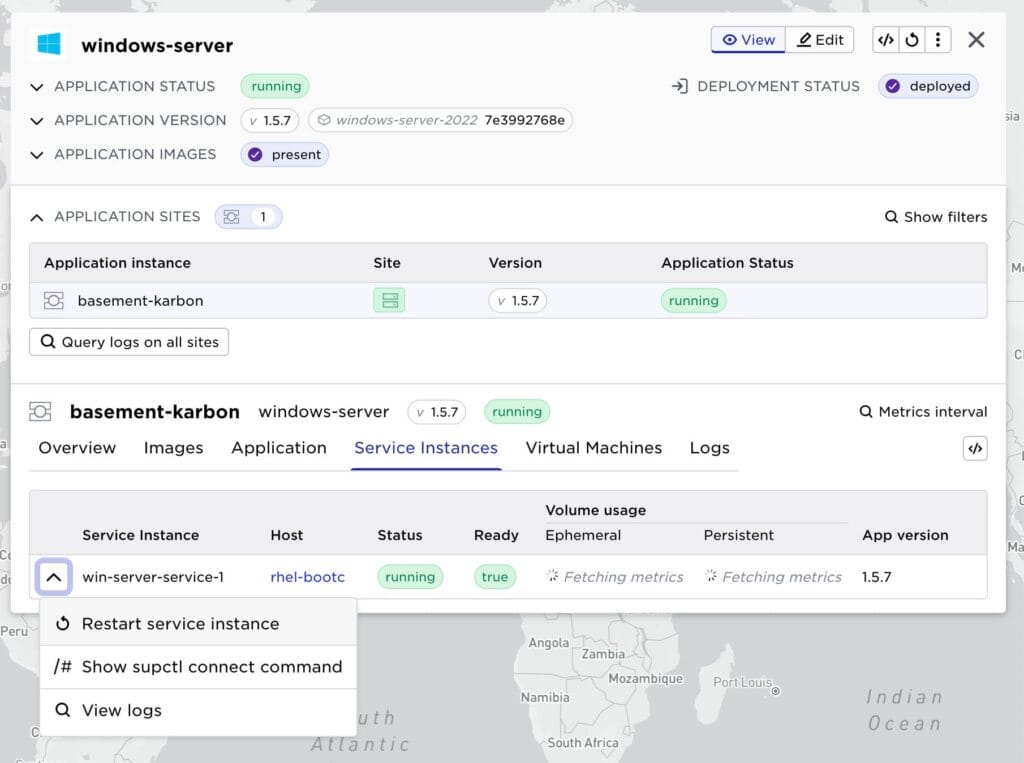
You can also use the VM functions for restart and power down.
The Edge Enforcer will also gracefully shut down the virtual machines at life-cycle stages like upgrades.
Enhanced VM base image and examples
Enhanced VM Base Image & Examples for Avassa
When orchestrating virtual machines in Avassa, you begin by building your container using an Avassa-provided base image. This base image handles essential VM lifecycle tasks such as launching the VM, managing the console, and more.
Learn more:
What’s New in the Enhanced Base Image?
The latest version of the VM base image brings several improvements aimed at simplifying usage and improving performance:
- Simplified Deployment Flow, the updated interface makes it easier to deploy VMs. You can now either:
- Download the VM image at deployment time, or
- Bake the image directly into your container.
- Improved ISO Installation Support, Installing from ISO files (e.g., for Windows setups) is now more user-friendly and streamlined.
- Updated Windows Example, The Windows VM example now includes support for both SATA and VirtIO drivers. It also comes with an unattended installation setup, enabling fully automated Windows VM provisioning.
Performance Optimizations
VM-based container images can be large. We’ve added multiple optimizations to improve load times and runtime performance. These enhancements also benefit users managing large “traditional” container images.
Passkey support and login flow usability
Introduction to Avassa authentication and the current User Interface
Avassa supports two main ways to authenticate users:
- Built-in Authentication with Strongbox: Avassa includes a distributed secrets manager called Strongbox, which stores authentication data both in the Control Tower and at edge sites. This ensures that user credentials are available even during disconnected operations.
- External Authentication via OIDC: Avassa also supports external authentication through OpenID Connect (OIDC) providers, such as:
- Azure Entra ID
- The Avassa Cloud Platform OIDC user, the user within your organization who got an account in the Avassa Cloud Platform to manage your environments. That is an external user that persists across several Control Towers.
Why use OIDC? External authentication provides centralized identity management, making it easier to maintain access control across multiple Control Towers.
In Avassa, the user is not enough to identify a user for authentication. This is because Avassa is a multi-tenant system. Users (identified by an email address) belong to tenants. Therefore, the user always needs to be combined with a tenant.
For each such identity there might be several authenticators:
💡(email, tenant) → (strongbox auth, external auth 1, external auth 2,…)
For example, the same user identity could authenticate:
- With Strongbox (local credentials)
- External auth via Azure Entra ID (corporate identity)
- External auth via the Avassa Cloud Platform (OIDC)
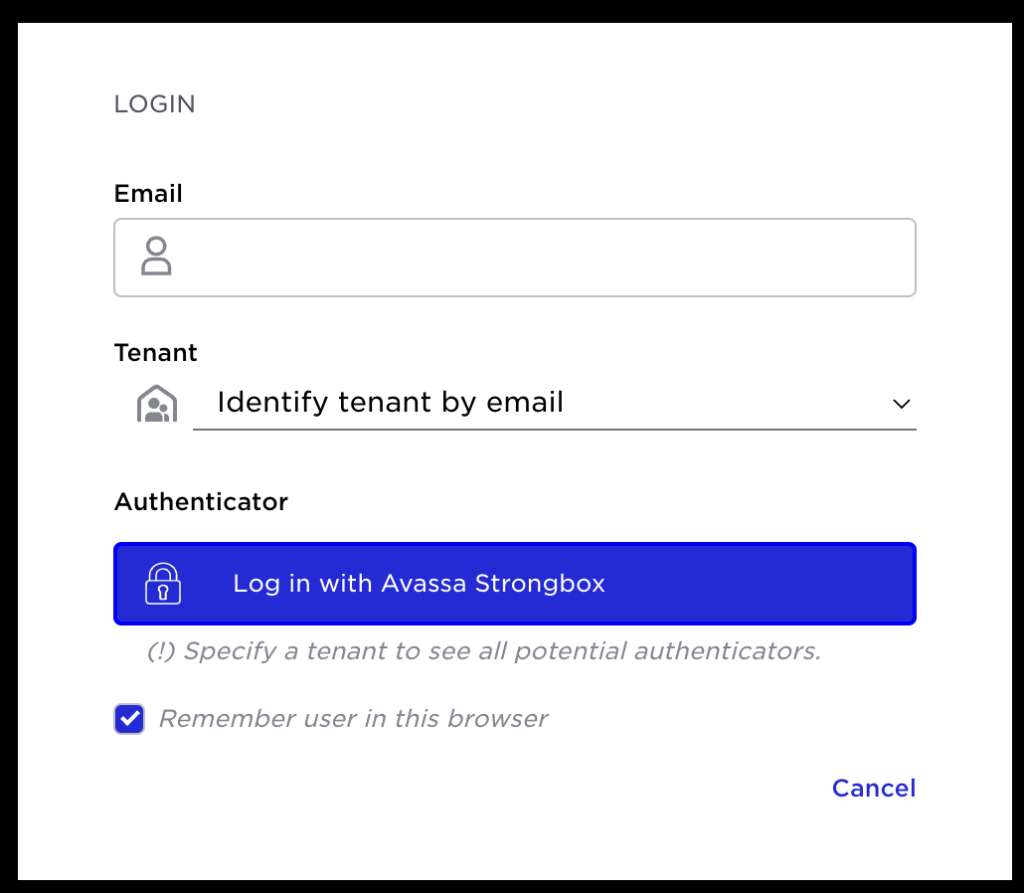
You might have seen this dialogue as the first login page:
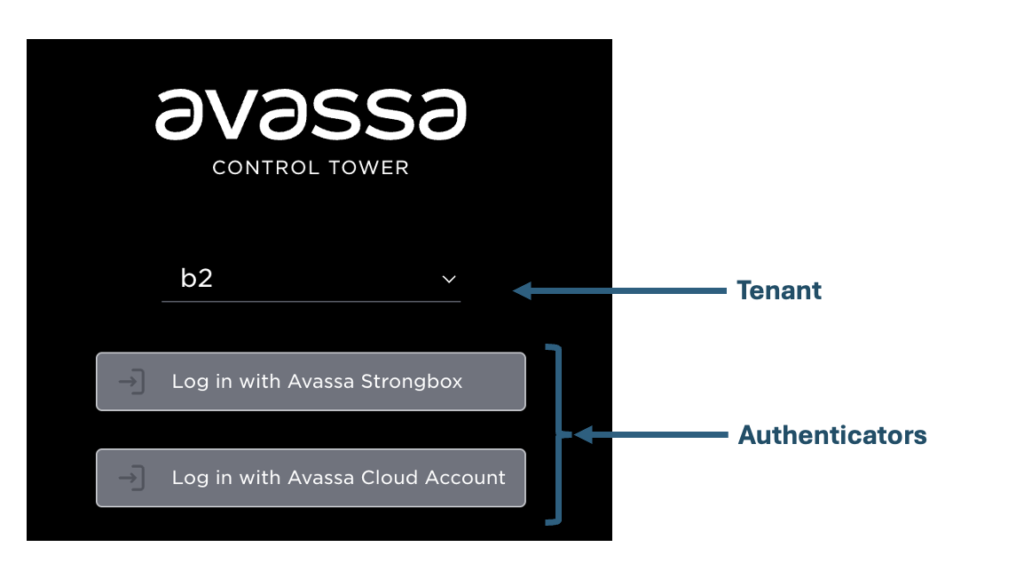
This indicates that I want to log in as tenant b2. I can log in with a user in Strongbox or use the Cloud Account as an external user. If you have configured other external OIDC mechanisms, they will also appear here.
After an authenticator is chosen the third and final step is to authenticate with the configured methods:
- password
- MFA one-time password
- Passkey 🆕, more on that below.
This means that we have this three-step procedure
💡 (email, tenant) → (authenticator) → (method: pwd, MFA, passkey🆕)
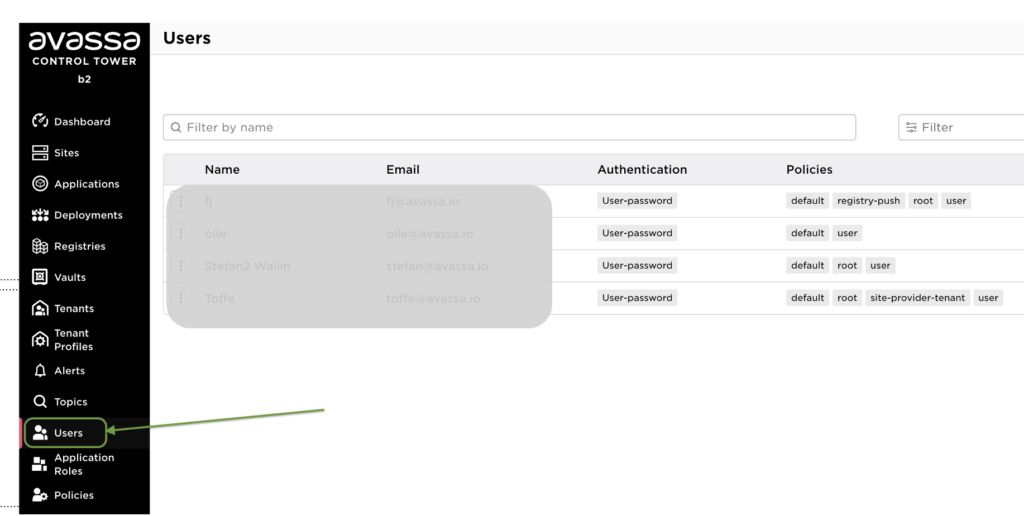
Strongbox users are managed in the Control Tower here:
A final note before moving on to what is new. Avassa is well-designed for offline scenarios. APIs and command line tools are available directly through a host on the site. If the site is offline, it has no connection to the Control Tower and most likely external authentication like an Azure Entra ID is option. This is where Strongbox comes into play; users in Strongbox are replicated to sites, so to prepare for offline, ensure you have Strongbox users (as well).
New enhanced login flow
The new enhanced login flow will make the
💡 (email, tenant) → (authenticator) → (method: pwd, MFA, passkey)
mapping clearer.
It also supports easier direct login flows for individual users within a specific tenant.
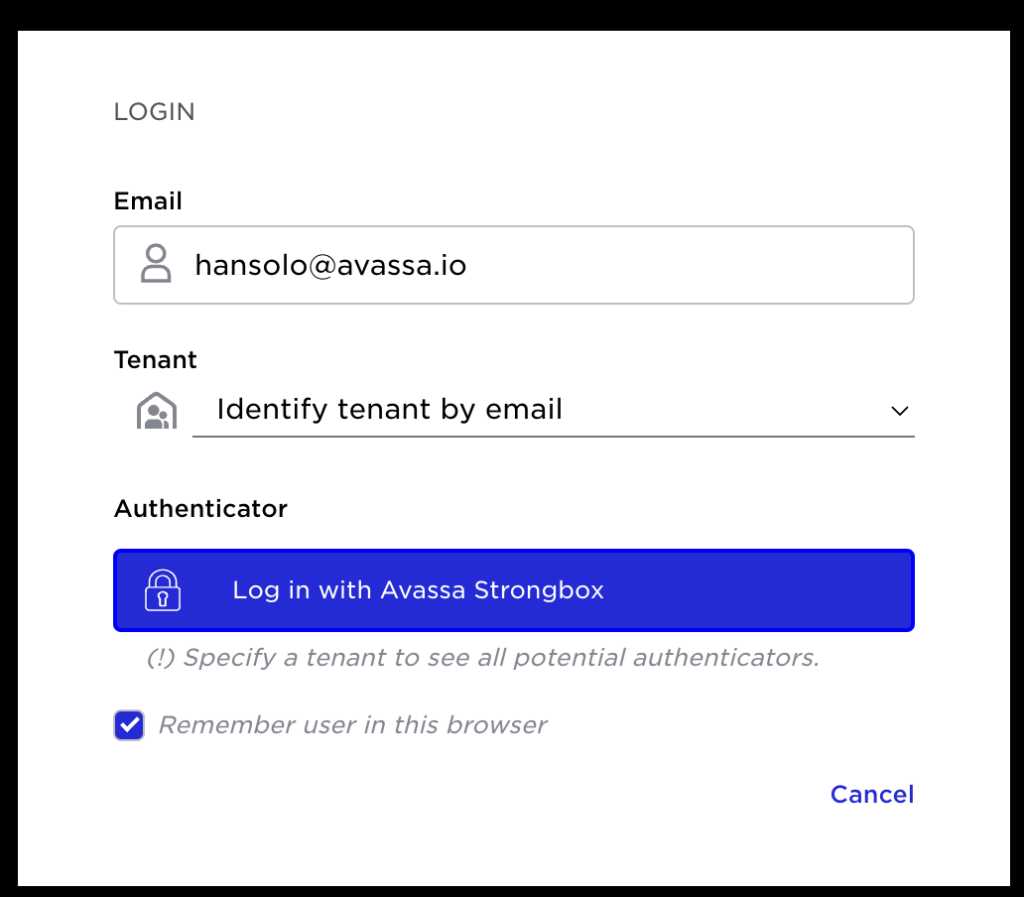
Step 1 identity
The new initial login always starts with the email identity and tenant selection:
You have several options; if your email is unique across tenants, you can let Avassa pick the tenant.
(Hint, email addresses do not have to be your real address, you can use different email addresses per tenant if you like, for example name+t1@example.com, name+t2@example.com)
Or choose a tenant:
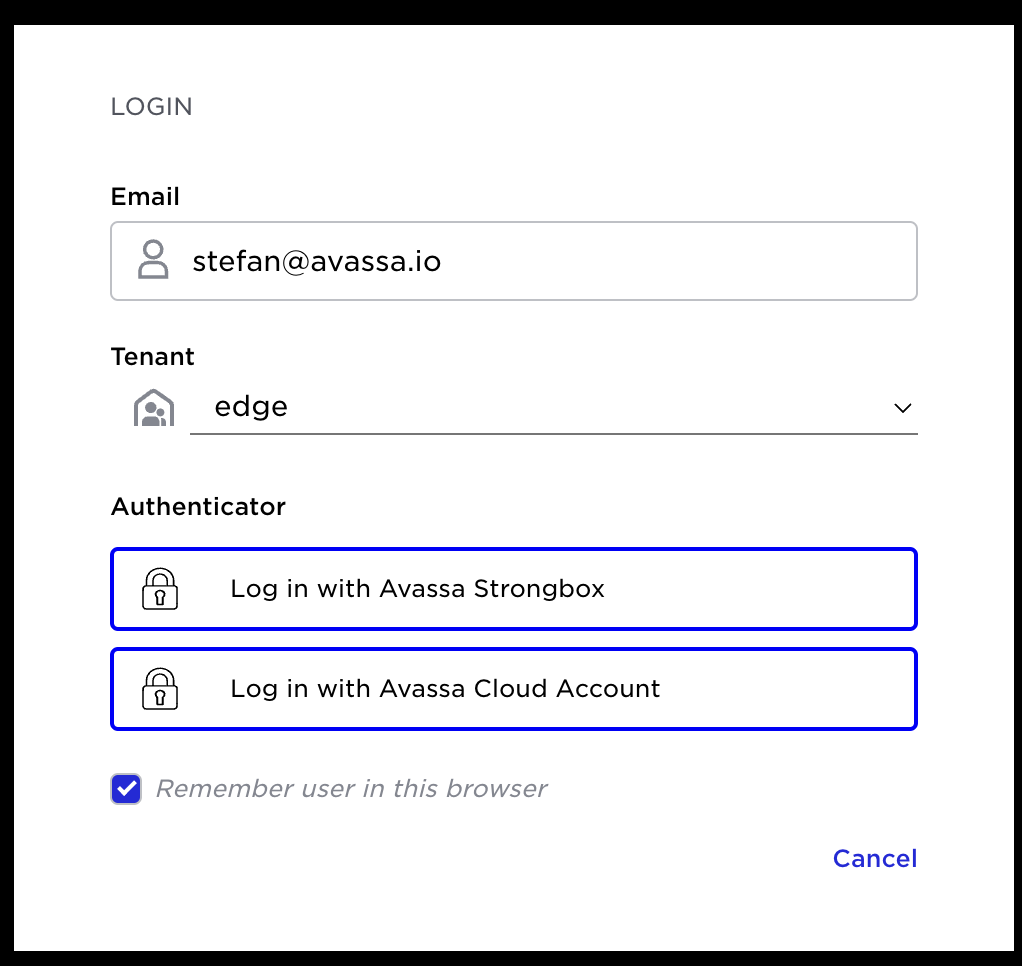
Step 2: authenticator
Now, the external authentication “Avassa Cloud Account” is added (see screen shot above) as authenticator since the user in this case exists there. Pick the authenticator, and the appropriate login authentication dialogue, step 3, will follow. (More on authentication later).
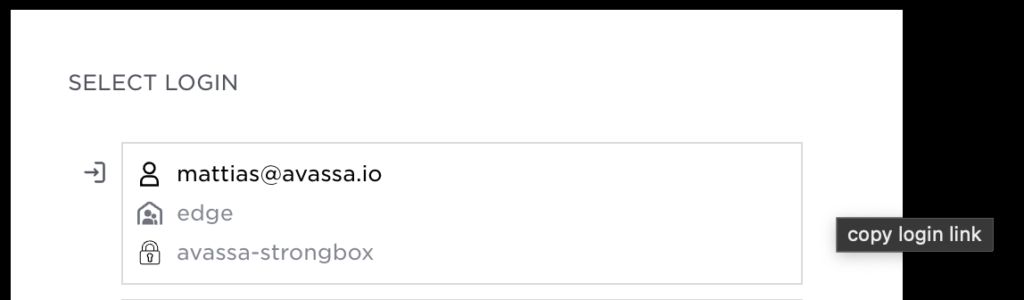
If you are part of a platform team, you likely have several accounts across tenants; there is now an option to remember these, so you will have a convenience list to choose from when logging in:
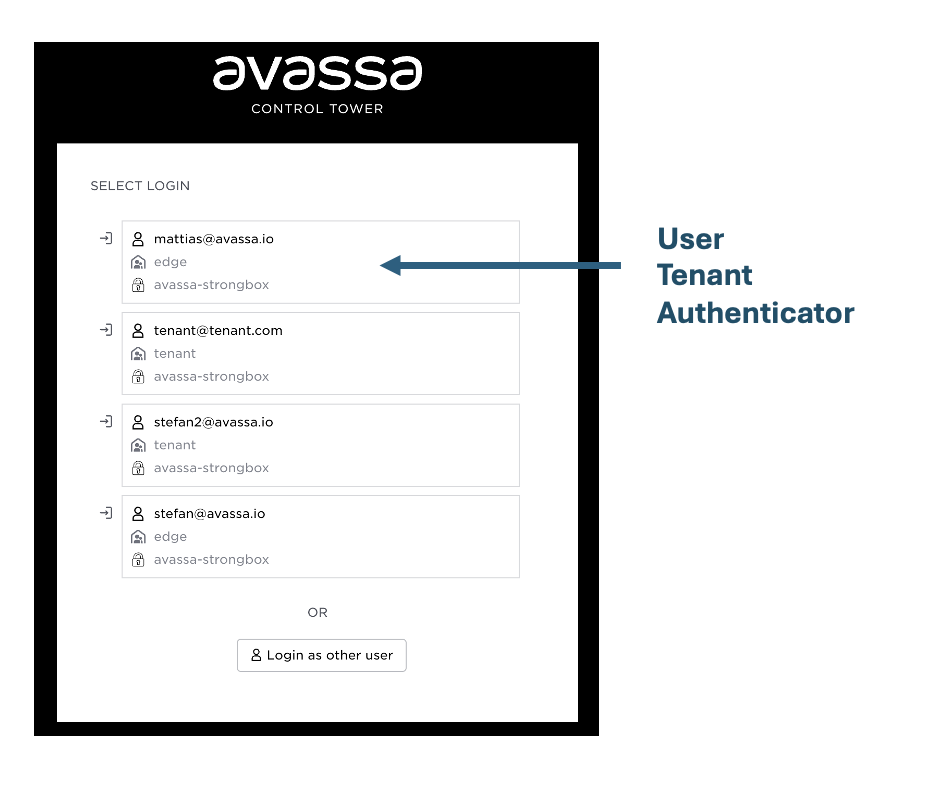
Each of the above remembered logins is the combination of user, tenant and authenticator.
(Login as other user will take you back to the initial login dialogue)
All logins also have a corresponding URL that can be used, I can for example copy the login link for “mattias@avassa.io,” and paste it directly in the browser, bookmark it, and forward it to a collegue:
Once logged in, you will see a couple of valuable features. In your account menu:
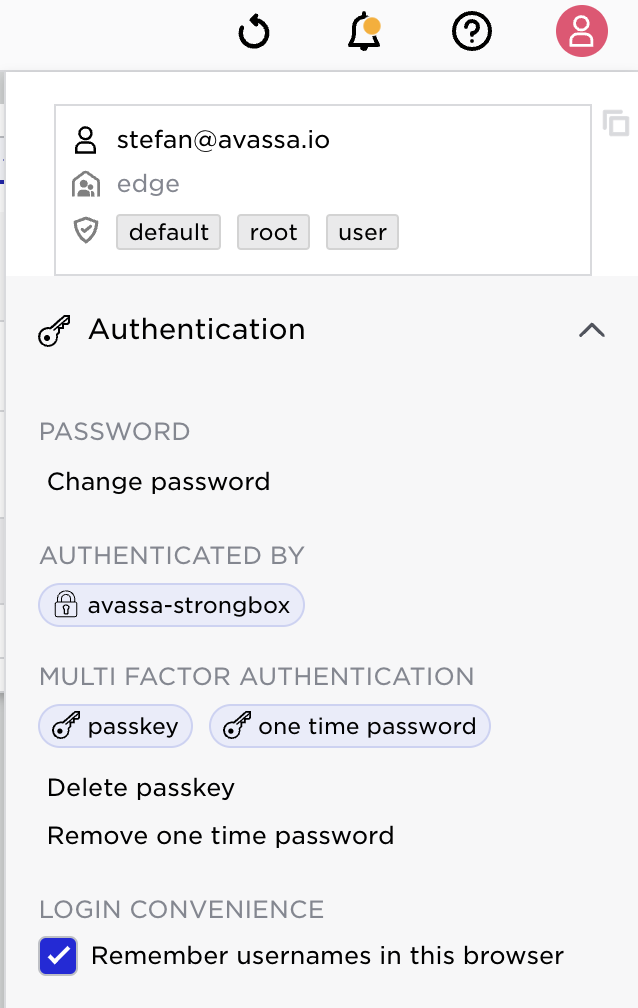
From top to bottom:
- clearer user and tenant info, including copying login URL
- direct link to modify password
- current authentication method and associated tools
- A checkbox to remember logins, this will build the list shown above “Select Login”, listing different users/tenants.
Step 3: Passkey authentication
Now lets move on to step 3, choose authentication method, and we will focus on the newly introduced passkey features.
Above we emphasized that a unique user in Avassa is a combination of email,tenant. For a certain authenticator there exist different authentication methods. Avassa has since before provided password and MFA one-time-password authentication. We have now added passkeys. Passkeys and MFA one time passwords can be enforced when creating the user or a user can add it later during a login flow.
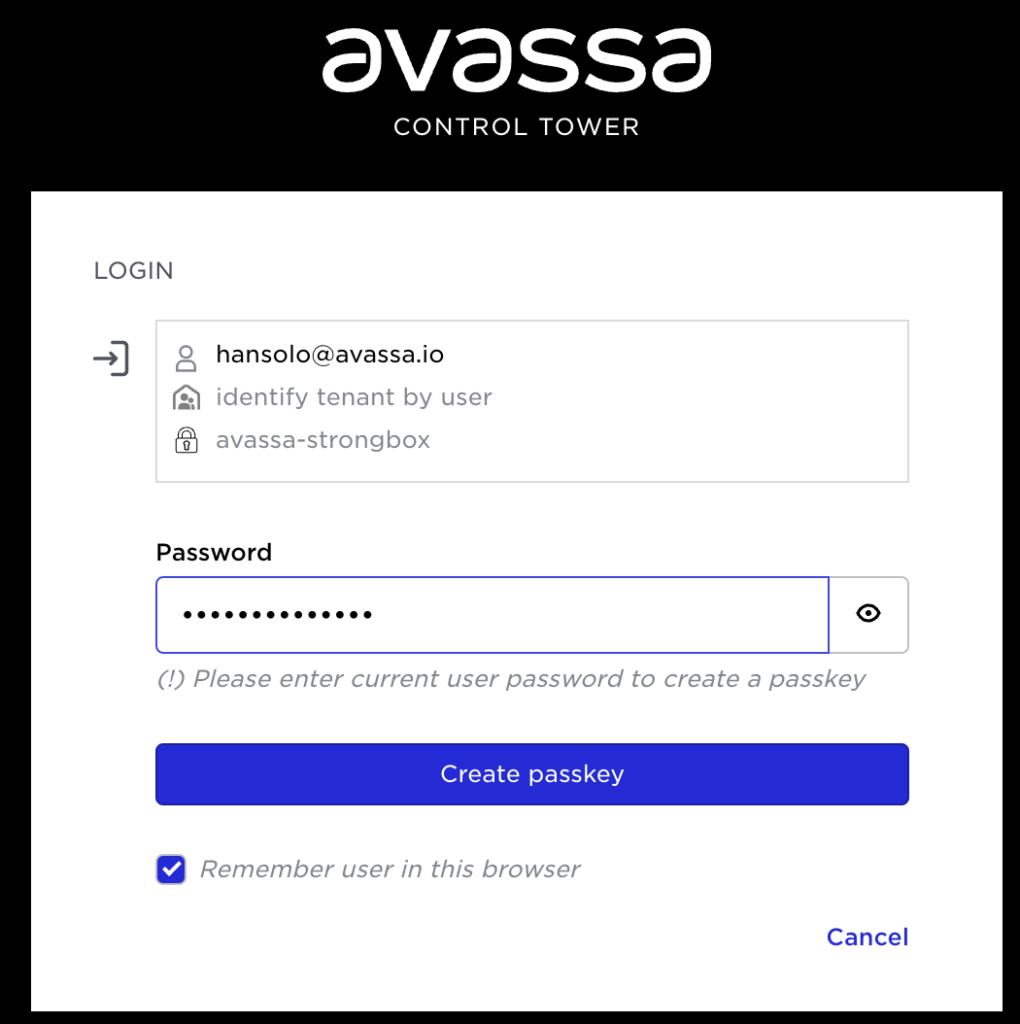
Let us illustrate the flow for a newly created user hansolo in Strongbox where the user wants to add a passkey:
First login:
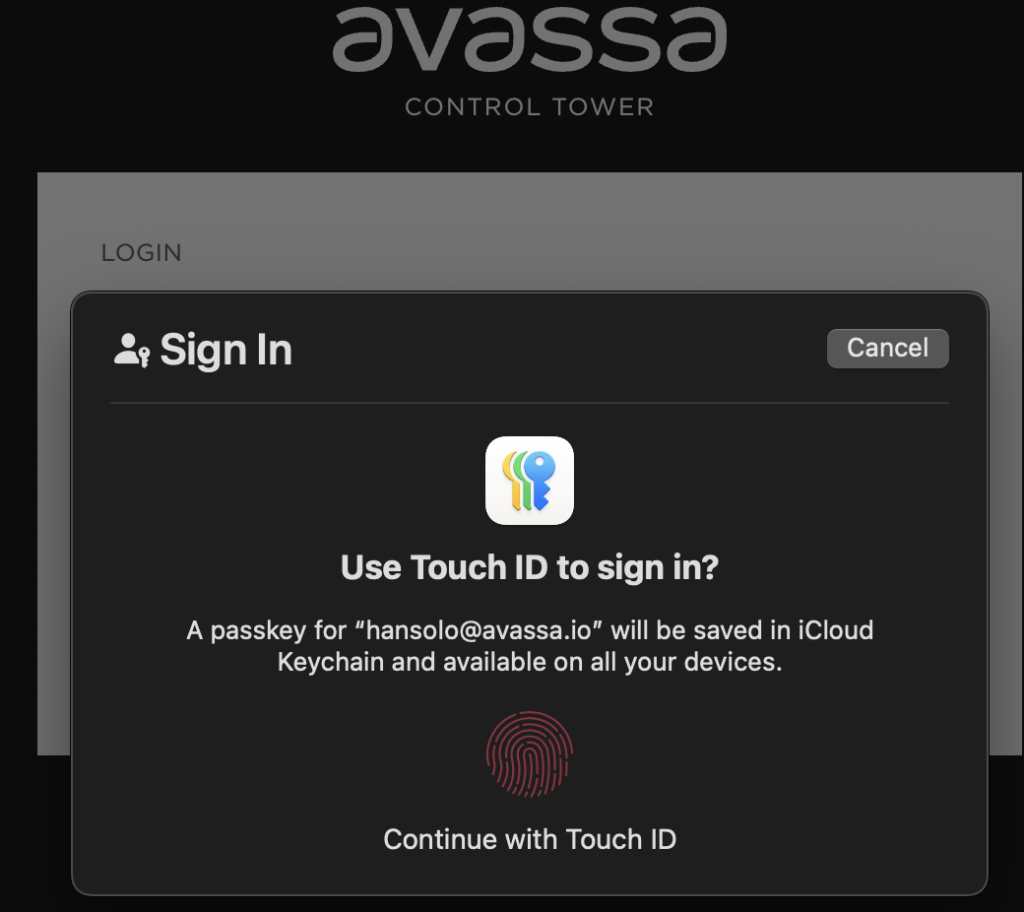
After logging in using a password in Strongbox, hansolo selects to create a new passkey in a second step:
The browser initiates the passkey flow. First, the passkey is created by the built-in fingerprint sensor
Secondly, that passkey is used to login:
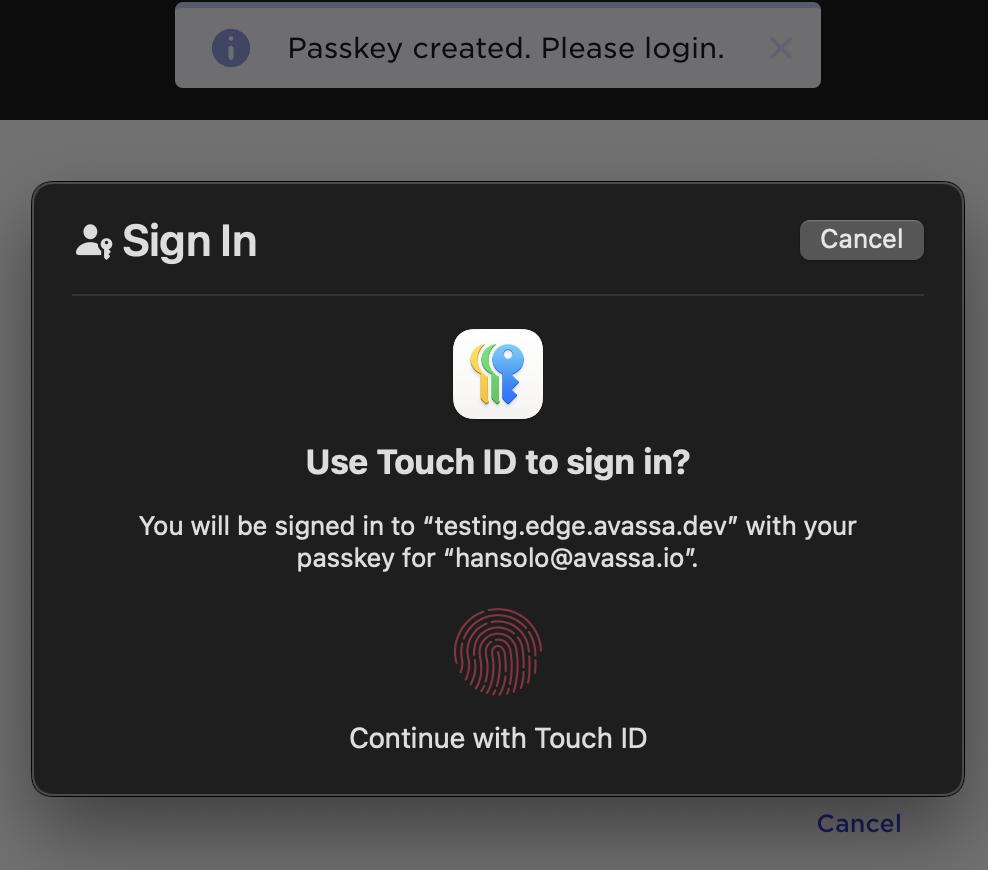
Voila! You are logged in.
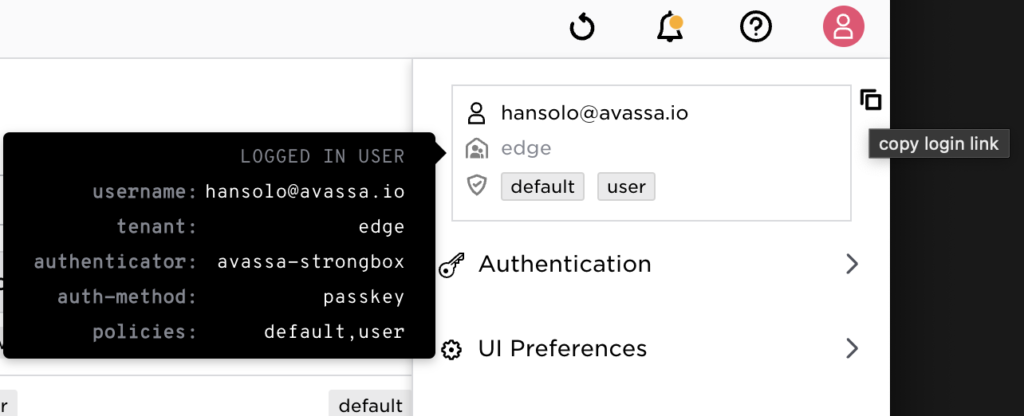
From now on it is very convenient to use the login URL for this user:
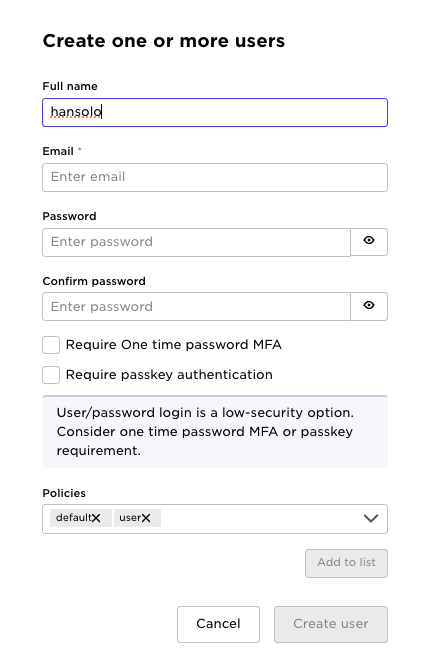
When the administrator creates a user, authentication methods can also be enforced:
Leveraging Passkeys
What Are Passkeys?
Passkeys are a modern, secure, and user-friendly alternative to passwords and one-time codes. They’re based on FIDO2/WebAuthn standards and use public-private key cryptography.
How Passkeys Work
- A private key is securely stored on your device (e.g., phone, laptop, security key).
- A public key is shared with the service during account setup.
- To log in, you simply unlock your device (via fingerprint, face, PIN, etc.).
- Your device then uses the private key to sign a cryptographic challenge—no password needed.
- You never see or type the key—authentication happens in the background.
Why They’re Better
- Phishing-resistant: No shared secrets to steal.
- Unique per site: One site’s breach doesn’t affect others.
- Fast: Microsoft reports average sign-ins take just 8 seconds vs. 69 seconds with passwords + MFA.
Syncing Across Devices
Passkeys can be stored locally or synced via cloud (e.g., iCloud Keychain, Google Password Manager) using end-to-end encryption, keeping your private key safe.