March 2026: Feature releases & highlights
SPIFFE, MCP server, Front-end support for call-home certificates.
- SPIFFE: Introduces SPIFFE-based workload identity, allowing services to authenticate using standardized, short-lived identities instead of manually managed tokens.
- MCP server: Adds an experimental built-in MCP server in
supctl, enabling AI assistants to interact directly with your Control Tower for inspection, troubleshooting, and configuration. - Edge Enforcer now enables seamless coexistence of built-in and custom firewall rules by using
nftableswith packet marking, allowing safe extension of firewall behavior without conflicts. - Front-end support for call-home certificates: Extends existing client certificate support by adding Control Tower front-end capabilities to generate installation scripts with embedded call-home certificates.
Federated credentials with Spiffe
A fundamental challenge for modern orchestrators is establishing trust between workloads without relying on manually managed credentials.
Traditionally, this has been handled with API keys, tokens, or other shared secrets that must be configured and maintained across multiple systems. This quickly becomes difficult to manage at scale, credentials need to be rotated, distributed securely, and kept in sync, creating both operational overhead and security risk.
What is SPIFFE?
SPIFFE addresses this problem by introducing a standardized way to assign identities to workloads. Instead of relying on pre-shared tokens, each workload is given a unique, verifiable identity that can be used directly for authentication.
At the core of SPIFFE is the concept of a SPIFFE ID, a URI-based identity that uniquely represents a workload within a trust domain. These identities are delivered through SVIDs (SPIFFE Verifiable Identity Documents), which are short-lived credentials available as either X.509 certificates or JWTs.
This shifts the model from managing credentials in multiple places to relying on automatically issued, short-lived identities, reducing the need for manual secret distribution and making authentication more robust in dynamic environments.
Summary of Avassa SPIFFE support
Avassa builds on the SPIFFE model to provide workload-native authentication based on identity rather than managed credentials.
Workloads in Avassa are assigned SPIFFE IDs and can obtain SVIDs, including JWT-SVIDs, which are used directly for authentication. This removes the need to provision and synchronize tokens between systems, as identity is established through standard SPIFFE mechanisms.
Avassa supports SPIFFE for both inbound and outbound authentication:
- Inbound: an external workload can authenticate to Avassa using a JWT-SVID. Strongbox verifies the JWT-SVID against configured trust material (JWKS or static keys), validates audience and expiry, and maps SPIFFE IDs to token policies.
- Outbound: workloads started by Avassa can be issued a JWT-SVID and/or X.509-SVID at login. These SVIDs can be presented to external systems that trust the configured issuer or CA.
Example SPIFFE usage at Avassa
To make this concrete, here’s how we use SPIFFE in Avassa to securely integrate with Amazon Web Services via the AWS Security Token Service (AWS STS). This pattern replaces long-lived cloud credentials with short-lived, automatically rotated identities tied directly to workloads.
What this enables
- No static IAM credentials stored in applications
- Strong workload identity (not host- or network-based)
- Automatic key and token rotation without operational effort
- Fine-grained access control based on SPIFFE IDs
How it works
- The Avassa workload authenticates to Strongbox using its AppRole
role-id+secret-id. - Strongbox issues an SPIFFE JWT-SVID signed by the configured transit key, with
aud: sts.amazonaws.comas the intended recipient, audience. - The workload calls AWS STS
AssumeRoleWithWebIdentitywith the JWT to receive temporary IAM credentials. - AWS validates the token via the configured OIDC provider and returns credentials.
- The workload refreshes the JWT automatically before expiry; signing keys rotate seamlessly in the background.

Avassa setup
First, define the signing key used for issuing SPIFFE JWT-SVIDs. This key is automatically rotated, with overlapping validity windows to ensure no downtime or race conditions during rotation. (Note: the configuration snippets below could be payload to the bulk command.)
x-path: /v1/config/strongbox/transit-keys/spiffe-jwt
x-operation: replace
name: spiffe-jwt
cipher: rsa-2048
auto-rotate:
  rotate-after: 30d
  activate-after: 1d
  deprecate-after: 2d
  invalidate-after: 2d
distribute:
  deployments:
    - <your-application>
Then configure Strongbox to use this key for SPIFFE JWT issuance:
x-path: /v1/config/strongbox/authentication/spiffe-settings
x-operation: replace
jwt-signing-key: spiffe-jwt
Next, define an AppRole that explicitly sets the audience to AWS STS. This is critical—AWS will reject tokens without the correct audience.
x-path: /v1/config/strongbox/authentication/approles/<your-application>
x-operation: replace
name: <your-application-approle>
token-no-default-policy: false
token-renewable: true
token-period: 1d
token-spiffe-jwt:
  jwt-audiences:
    - sts.amazonaws.com
distribute:
  deployments:
    - <your-application>
Finally, define the workload:
- The AppRole injects the secret automatically
- The API CA certificate ensures secure TLS validation when calling Strongbox
containers:
  - name: <your-application>
    approle: <your-application-approle>
    env:
      APPROLE_SECRET_ID: ${SYS_APPROLE_SECRET_ID}
    mounts:
      - volume-name: api-cert
        mount-path: /certs
volumes:
  - name: api-cert
    config-map:
      items:
        - name: api-ca-cert.pem
          data: |
            ${SYS_API_CA_CERT}
AWS setup
Two resources are required in AWS: an OIDC identity provider and an IAM role.
- IAM OIDC Identity Provider
Register Strongbox as a trusted identity provider.
| Field | Value |
|---|---|
| Provider URL | The HTTPS URL of the SPIFFE OIDC discovery endpoint e.g. https://api.<your-environment-url>/<tenant-uuid> Retrieve from spiffe-settings state |
| Audiences | sts.amazonaws.com |
This allows AWS to validate JWT-SVIDs issued by Strongbox.
- IAM Role
Create a role with a trust policy that strictly binds access to a specific SPIFFE identity. Trust policy conditions:
| Condition | Operator | Value |
|---|---|---|
api.<your-environment-url>/<tenant-uuid> | StringEquals | sts.amazonaws.com |
api.<your-environment-url>/<tenant-uuid> | StringEquals | The SPIFFE ID of the workload (e.g. spiffe://api.<your-environment-url>/approle/<app-name>) |
Additional requirements:
- The principal must reference the ARN of the OIDC provider
- Attach IAM permissions matching what the workload needs
- Ensure the AppRole includes the sts.amazonaws.com audience
Why this matters
This pattern fundamentally shifts how cloud access is managed:
- From secrets → to identity
- From static credentials → to ephemeral tokens
- From manual rotation → to continuous automation
For edge and distributed environments, this is especially powerful:
- No credential distribution problem
- No secret sprawl across sites
- Works even with intermittent connectivity
Experimental MCP Server
supctl now includes an experimental built-in Model Context Protocol (MCP) server, enabling AI assistants to connect directly to your Control Tower. Once configured, you can ask your AI assistant to inspect cluster health, diagnose application failures, tail recent alerts, and propose configuration changes – without manually running supctl commands and pasting output.
The MCP server works with any MCP-compatible client, including Claude Code, Claude Desktop, ChatGPT, Codex, Cursor, Zed, and others.
Follow along as I run my first Claude session in my demo environment. First, I am asking Claude about the state of my demo sites:

Now, let’s move on to learn about deployed applications and their state:
what are the states of the deployed applications, and on which sites are they deployed?
Claude gives me a summary:
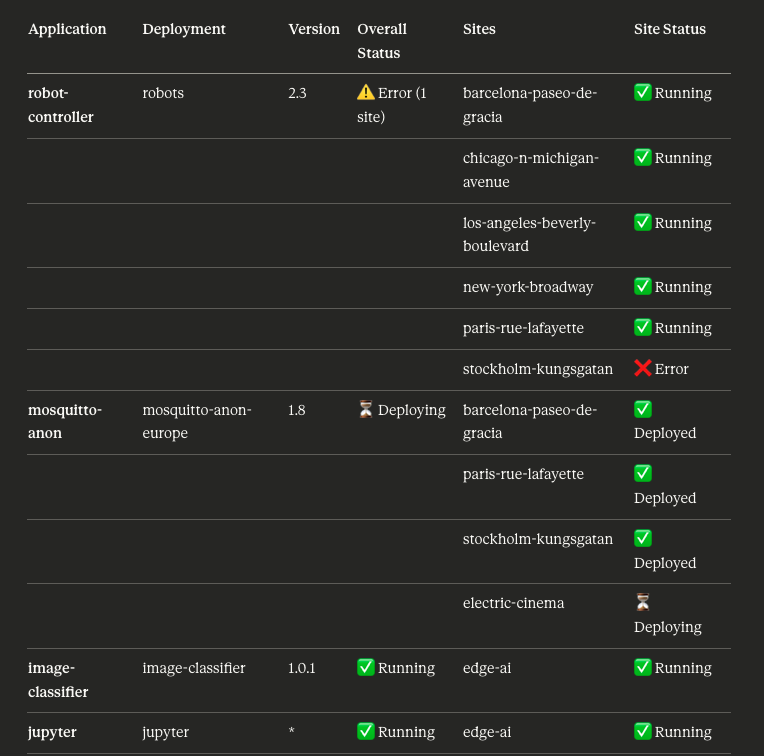
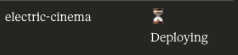
It clearly shows me that I have an application error on the stockholm-kungsgatan site, and an ongoing deployment on electric-cinema.
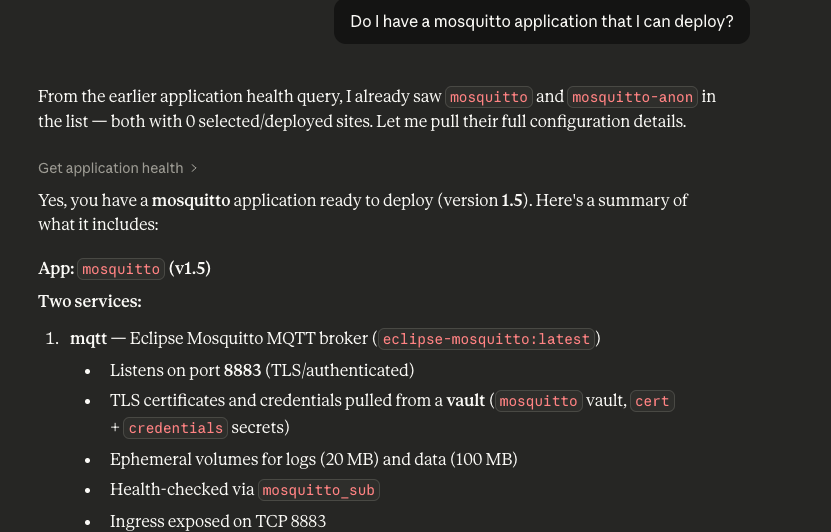
The previous examples focused on understanding the current state of the system. Let’s now move on to configuration changes.
As shown earlier, we have a Mosquitto application running. Let’s see how Claude can assist in modifying its configuration.
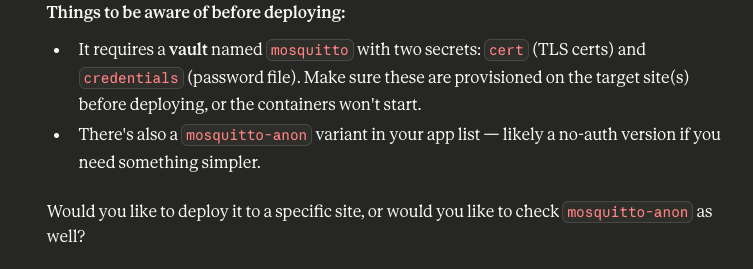
I would also like to understand existing site labels so I can target the deployment:
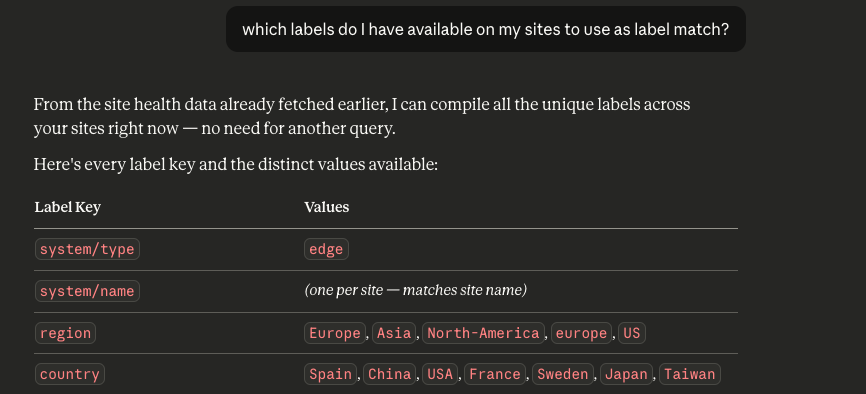
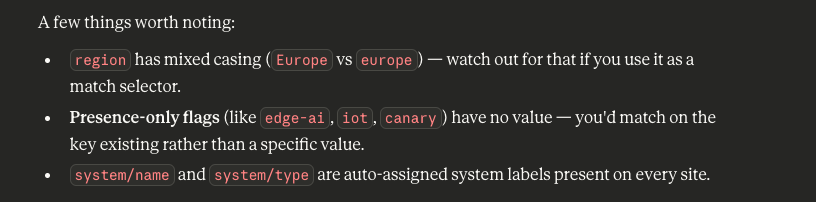
The Avassa MCP server uses a staging concept for configuration changes. When you ask Claude to make a configuration change, it stages the change so that you can inspect it. Then you can apply it. The screenshots below illustrate the deployment staging steps
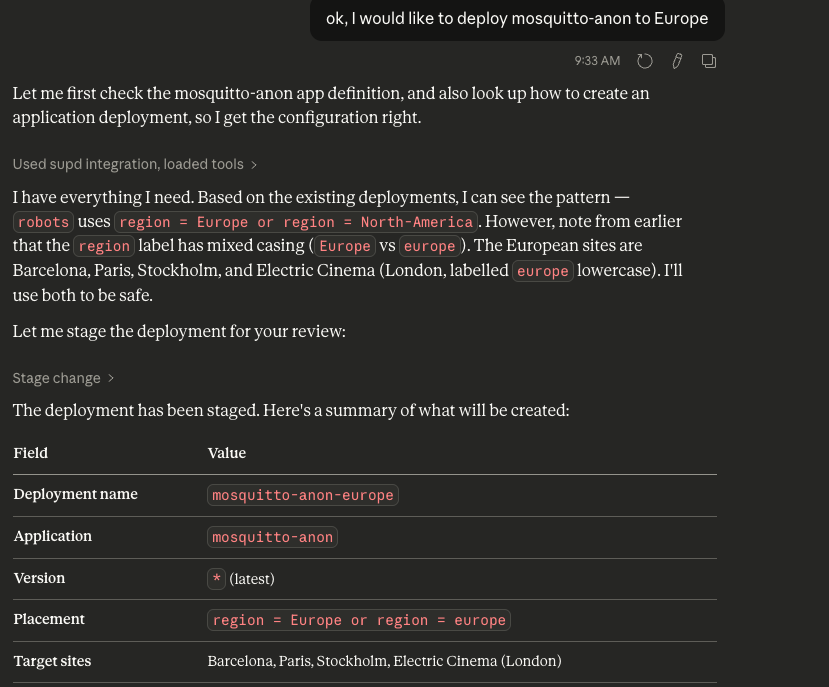
Note well how I get help with label matching: I had inconsistent labels for “Europe”.
Finalizing this scenario in supctl:
$ supctl mcp staged show
Target: api.demo-edge.b2.avassa.net (tenant: b2)
Staged changes: 1

Change #1: Deploy mosquitto-anon to all European sites using region label match
  Method: create
  Path:   application-deployments
  Data:
    application: mosquitto-anon
    application-version: '*'
    name: mosquitto-anon-europe
    placement:
      match-site-labels: region = Europe or region = europe
$ supctl mcp staged apply
Applying: Deploy mosquitto-anon to all European sites using region label match
All 1 change(s) applied successfully.
Staging file removed: ...
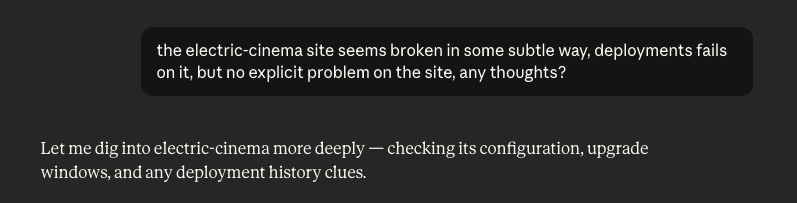
All fine, but remember that it was waiting for electric-cinema:
Why?
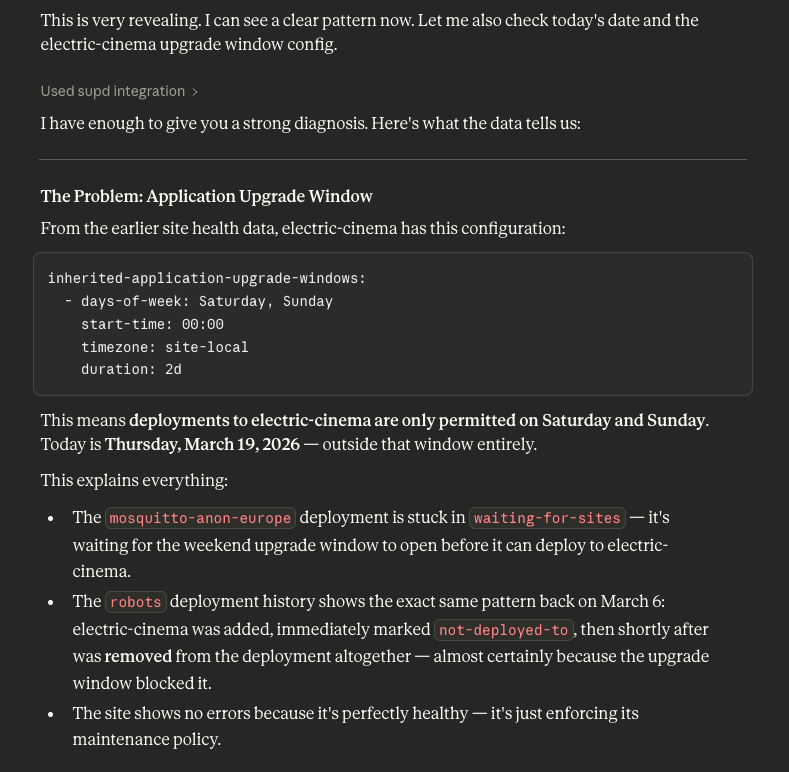
Another value is that Claude will summarize changes between two status checks. Below is another inspection of the application status:
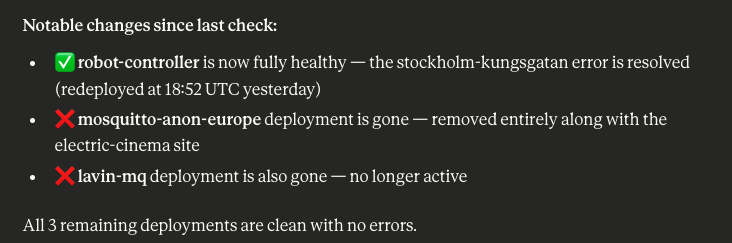
The MCP walkthrough shows how AI assistants can interact directly with your Control Tower to both understand system state and safely make changes. Instead of manually running commands and stitching together outputs, operators can work conversationally with a live system context. This reduces operational friction, speeds up troubleshooting, and makes configuration workflows more intuitive
Co-existence with firewall rules
Edge Enforcer uses nftables, enabling a more modular firewall model where multiple rule sets can coexist. This release adds support for combining your own firewall rules with those managed by Edge Enforcer.
To simplify interoperability, Edge Enforcer marks relevant packets as they traverse the firewall, allowing custom rules to reliably identify and handle them. This makes it possible to extend or customize firewall behavior without interfering with the built-in configuration.
Read more:
https://docs.avassa.io/how-to/firewall-conf
Stronger Call-Home Authentication with Client Certificates
As you know, the host ID serves as a shared secret that enables hosts with Edge Enforcer installed to call home and register with the Control Tower. This mechanism ensures that only hosts with the correct credentials can join a site.
Some users may not be aware that Avassa has supported client certificates for call-home authentication for some time. With this approach, hosts authenticate via mutual TLS, adding an additional layer of security and ensuring that only trusted machines can register and communicate with the platform.
This capability is now fully supported in the Control Tower UI, making it easy to generate Edge Enforcer installers configured with the corresponding certificates.
In the following steps, we show how to generate the installer and certificate package from the UI and use it during installation to enable secure call-home authentication.
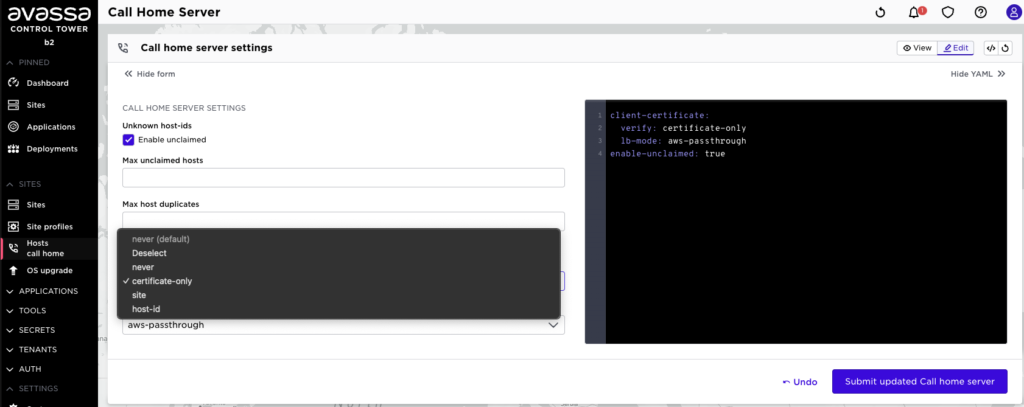
First, go to call home settings and select the granularity of the call-home certificates.
- never: no certificate is used, only the host-id shared secret
- certificate-only: a single global cert for the entire Control Tower
- site: a unique certificate per site
- host-id: a unique certificate per host
Also configure aws-passthrough. This ensures that the certificates presented by Edge Enforcers are forwarded to Control Tower, where they can be validated during the call-home process.
Now, let’s install a new Edge Enforcer and onboard the host to a site. In this example, we assume the certificate-only option described above.
Select the Install Edge Enforcer menu. This opens the dialog to get the install command.
The first parameter to choose is the TTL for the call-home certificate. For this example, we use the default value of 1 day. This means that the certificate is valid for the initial call-home process during that time window. If the host attempts to call home after the TTL has expired, the registration will fail, and a new certificate must be generated.
Note that this certificate is only used for the call-home authentication step. It is not used for the ongoing encryption or security of communication between hosts and sites after onboarding.
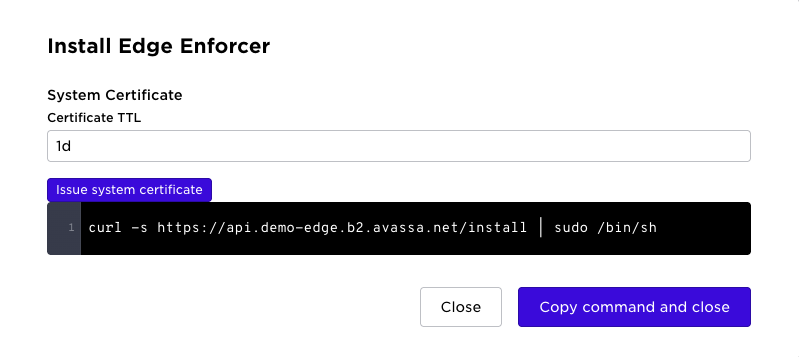
Select the “Issue system certificate” badge above. Now the certificate will be appended to the install script as shown below:
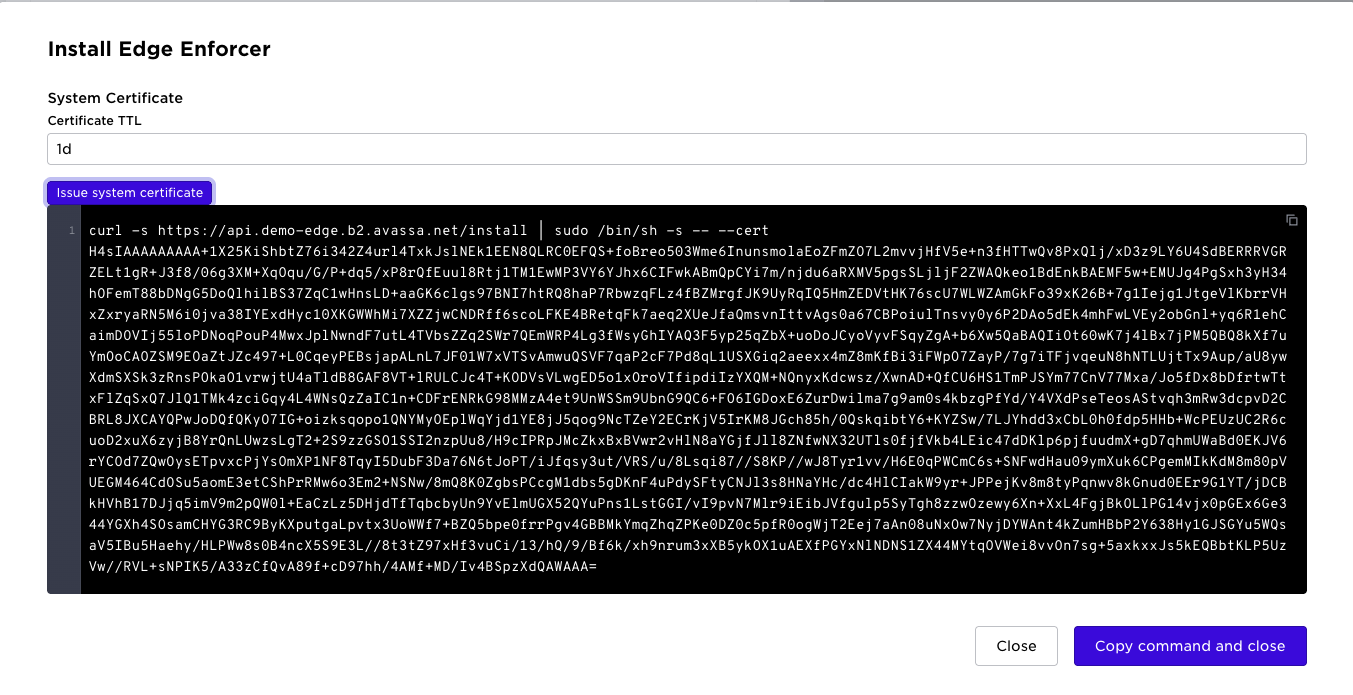
Copy that command and get to your shell on the edge host and paste it:

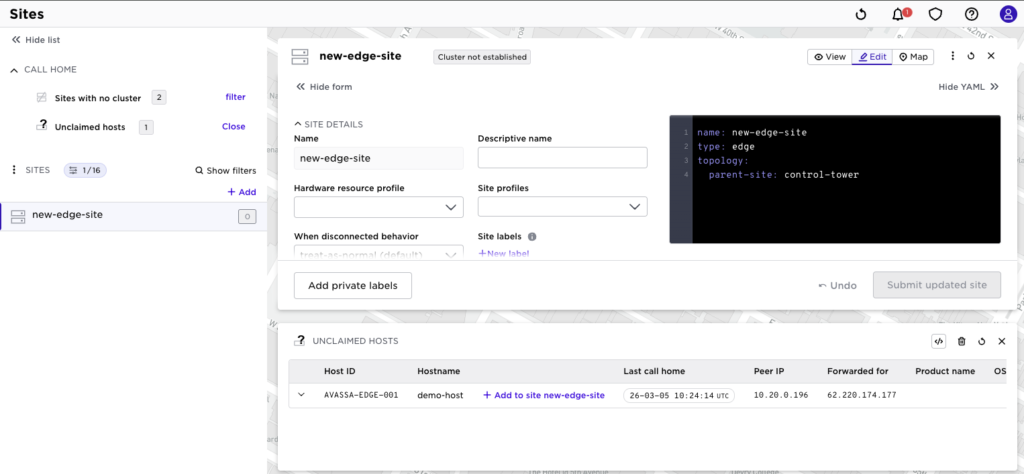
After successful installation, the host will show up as normal, and you can add it to your site:
Using client certificates strengthens the security of the call-home process by requiring hosts to present both the host-id and a valid certificate when registering with Control Tower. This provides stronger assurance that only trusted machines can onboard, making the mechanism better suited for environments with stricter security requirements or automated installer distribution.
(Note: we might enhance this in upcoming releases and use JWT/X.509 as an alternative to mTLS)
Other minor additions
- Configurable CA certificate subject fields: you can now set fields like
subject-country,subject-orgetc. - Variables are now supported in both policies and tenant resource profiles’ ingress range expressions.
With SPIFFE securing workload identity, client certificates tightening connectivity, and the MCP server opening up new interaction patterns, the question becomes: are MCP and LLM-native clients the next “must-have” interfaces—joining Web UI, REST, and CLI as first-class ways to operate modern platforms?