How to securely enable SSH access to your edge hosts
At the edge sites, where our customer have deployed Edge Enforcers to manage the container application, there are often other servers and network equipment. At times the operations team must access these other resources. Typically this is done via SSH.
While we at Avassa takes pride in not requiring any open ports to the edge site and minimal need for connecting to the edge hosts themselves, we know that our customers at time must connect to hosts and other resources on the edge network.
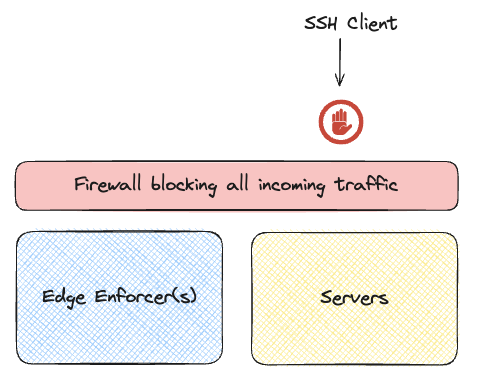
Typically access is blocked by a firewall, that will not allow any incoming traffic.
We’re going to use two Avassa features, first the ability to get a remote shell in a running container. This is provided by the Avassa platform. Second, we will utilize SSH Certificates (see https://en.wikibooks.org/wiki/OpenSSH/Cookbook/Certificate-based_Authentication) where we can configure hosts to allow ssh clients, that can present valid certificates, to connect. The Avassa platform has the ability to generate such client (and server) certificates.
The idea is to use these Avassa features to allow for the following concept:
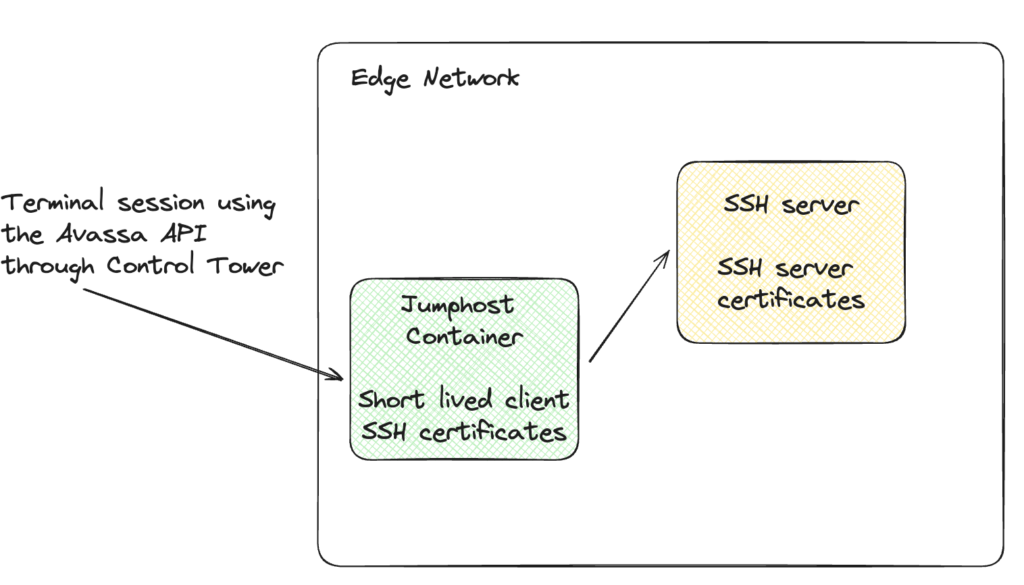
In this post I’ll describe how to setup a container-based jump host at the Edge and use the Avassa APIs to connect to edge local servers.
SSH Certificates and remote terminal sessions

In this blog post, I will show how to deploy an SSH server, this is just to get a self-contained demo. In reality you will configure your SSH servers in the same way though.
First thing we need to do is declare an SSH CA in Strongbox:
supctl create strongbox ssh ca <<EOF
name: ssh-ca
distribute:
  deployments:
    - ssh-client
    - ssh-server
EOF
Next we define what you can do with this certificate:
supctl create strongbox ssh ca ssh-ca roles <<EOF
name: cert-issuer
key-type: "ca"
allowed-domains:
 - "*"
allowed-users:
 - "*"
ttl: 1y
allow-user-certs: true
allow-host-certs: true
allow-bare-domains: true
allow-subdomains: true
allow-user-key-ids: false
EOF
Please see https://avassa-api.redoc.ly/tag/SSH-CA-Roles#operation/v1_config_strongbox_ssh_ca_ssh_ca_name_roles_post for more details on the CA roles.
Next we will define vaults for the SSH client and server. NOTE, in a real world scenario, you would only create the client parts
supctl create strongbox vaults <<EOF
name: ssh-client
distribute:
  deployments:
    - ssh-client
EOF

supctl create strongbox vaults ssh-client secrets <<EOF
name: client-cert
auto-ssh-cert:
  cert-type: user
  issuing-ca: ssh-ca
  issuing-role: cert-issuer
  ttl: 2h
  valid-principals:
    - test
  extensions:
    - permit-pty
    - permit-agent-forwarding
    - permit-user-rc
allow-image-access: ["*"]
EOF
Worth noting above is that test is the actual username we’ll user in the server. Also note the extensions, at least permit-pty is recommended.
Same thing for the server part of the demo
supctl create strongbox vaults <<EOF
name: ssh-server
distribute:
  deployments:
    - ssh-server
EOF

supctl create strongbox vaults ssh-client secrets <<EOF
name: server-cert
auto-ssh-cert:
  cert-type: host
  issuing-ca: ssh-ca
  issuing-role: cert-issuer
  ttl: 30d
allow-image-access:
  - "*"
EOF
Finally we will deploy the ssh client and server applications
supctl create applications <<EOF
name: ssh-client
services:
  - name: host
    mode: replicated
    replicas: 1
    volumes:
      # Fetch the ssh-client certificate
      - name: cert
        vault-secret:
          vault: ssh-client
          secret: client-cert
          file-mode: "400"
          file-ownership: 0:0
    network:
      outbound-access:
        allow-all: true
    containers:
      - name: jump
        image: registry-1.docker.io/alpine
        cmd:
          - sh
          - "-c"
          - "apk add openssh; sleep infinity"
        mounts:
          - volume-name: cert
            files:
              # Mount the private key
              - name: ssh-private-key
                mount-path: /ssh/private-key
              # Mount the certificate, note the name convention <private key name>-cert.pub
              - name: ssh-cert
                mount-path: /ssh/private-key-cert.pub
EOF
This simply launches an alpine image, installs openssh and then the container will sleep just to stay up.
The server is somewhat more complicated. It declares an ingress address on port 22 and configures the ssh daemon to only allow users that can present a certificate.
supctl create applications <<EOF
name: ssh-server
services:
  - name: host
    mode: replicated
    replicas: 1
    volumes:
      - name: cert
        vault-secret:
          vault: ssh-server
          secret: server-cert
          file-mode: "400"
          file-ownership: 0:0
      - name: configs
        config-map:
          items:
            - name: entrypoint.sh
              file-mode: "500"
              data: |
                #!/bin/sh
                apk add openssh
                cat /etc/ssh/avassa_sshd_config >> /etc/ssh/sshd_config
                ssh-keygen -A

                # Add a test user
                adduser -h /home/test -s /bin/sh -D test
                echo -n 'test:secret' | chpasswd

                touch /etc/ssh/revoked_keys

                exec /usr/sbin/sshd -D -e "$@"
            - name: sshd_config
              file-mode: "300"
              data: |
                 PasswordAuthentication no
                 HostKey /etc/ssh/ssh_avassa_host_key
                 HostCertificate /etc/ssh/ssh_avassa_host_key-cert.pub
                 TrustedUserCAKeys /etc/ssh/ssh_avassa_user_key.pub
                 RevokedKeys /etc/ssh/revoked_keys

    network:
      outbound-access:
        allow-all: true
      ingress-ip-per-instance:
        protocols:
          - name: tcp
            port-ranges: "22"
    containers:
      - name: host
        image: registry-1.docker.io/alpine
        cmd:
          - /entrypoint.sh
        mounts:
          - volume-name: cert
            files:
              - name: ssh-public-key
                mount-path: /etc/ssh/ssh_avassa_host_key.pub
              - name: ssh-private-key
                mount-path: /etc/ssh/ssh_avassa_host_key
              - name: ssh-cert
                mount-path: /etc/ssh/ssh_avassa_host_key-cert.pub
              - name: ssh-ca-public-key
                mount-path: /etc/ssh/ssh_avassa_user_key.pub
          - volume-name: configs
            files:
              - name: entrypoint.sh
                mount-path: /entrypoint.sh
              - name: sshd_config
                mount-path: /etc/ssh/avassa_sshd_config
EOF
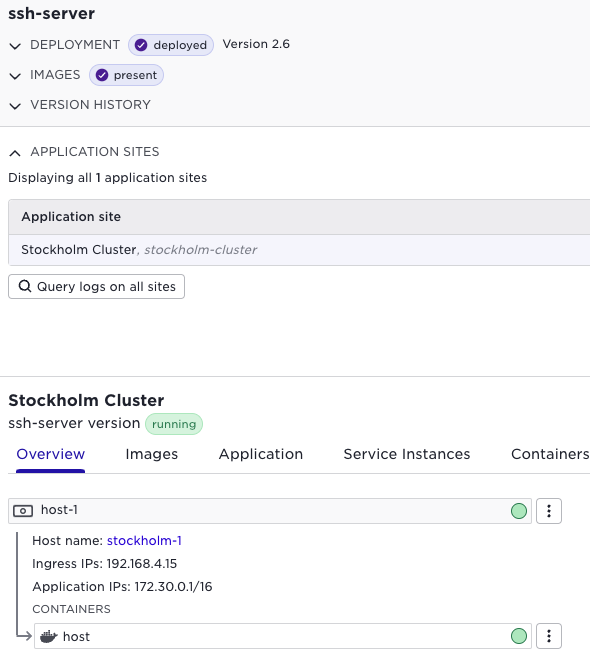
With these up and running, we can figure out the ssh server ip address from the UI:
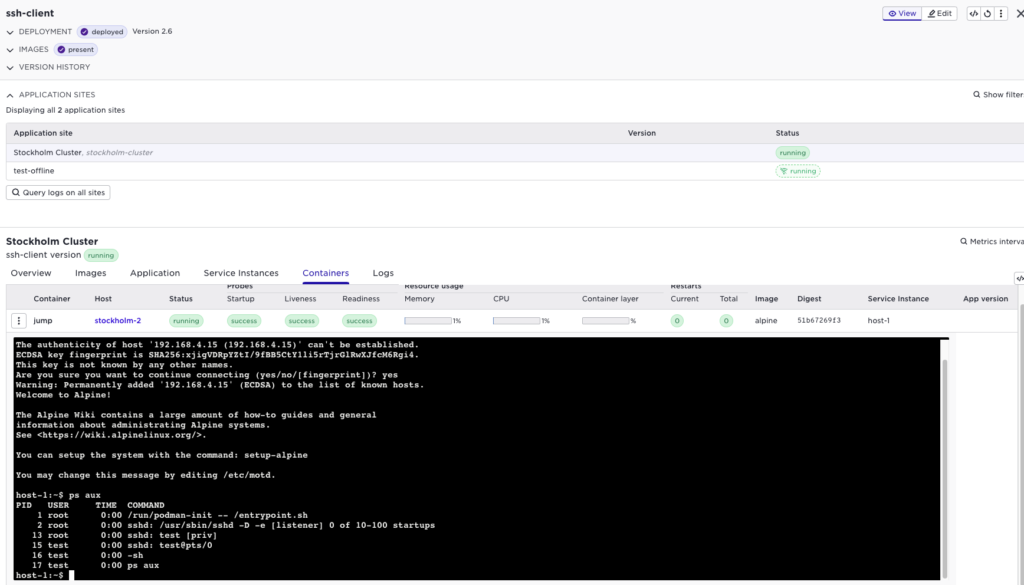
Then we can terminal in to the client:
Of course this can also be done using supctl:
supctl do --site stockholm-cluster applications ssh-client service-instances host-1 containers jump exec-interactive sh
$ ssh -i /ssh/private-key test@192.168.4.15
Welcome to Alpine!

The Alpine Wiki contains a large amount of how-to guides and general
information about administrating Alpine systems.
See <https://wiki.alpinelinux.org/>.

You can setup the system with the command: setup-alpine

You may change this message by editing /etc/motd.

host-1:~$ exit
Connection to 192.168.4.15 closed.
Also worth noting, if I don’t specify any certificate, the SSH server will deny the connection:
$ ssh test@192.168.4.15
test@192.168.4.15: Permission denied (publickey,keyboard-interactive).
Conclusion
By deploying a simple SSH jump host container, and configuring your servers for certificate authentication, you can very easily deploy the jump host containers to any edge site. Then you can use the secure Avassa remote terminal session to access your local servers.
All payloads can be found here: https://gitlab.com/avassa-public/application-examples/-/tree/main/jumphost?ref_type=heads